Using the Norce Backend MCP Servers
The Norce Backend MCP Servers give AI assistants a direct, structured connection to Norce Commerce. Instead of manually navigating Admin UIs or writing one-off API scripts, you can ask an AI to read and update your data — and it knows exactly which tools to use and how to use them safely.
This guide covers how to configure and connect to the Backend MCP Servers. For examples of what you can do with them, see End-to-end use cases.
Before you begin
Make sure the following are in place before you start the connection setup:
- You have a Norce OAuth2 client with a
ClientIdandClientSecret— create one in Norce Admin under Settings > Users > OAUTH if you do not have one yet - MCP access is activated for that client ID in the same settings page
- The OAuth2 client has access to the Management API, Connect API, Query API, and Commerce Services APIs
- You know the
AccountIdfor the Norce environment you want to connect to - You know the application ID for the storefront you will be working with (used in most tool calls)
- Node.js is available on your machine — needed to install the
mcp-remotebridge used by desktop clients such as Claude Desktop; VS Code and Cursor connect directly over HTTP
If you are setting up access for a team or need guidance on how to scope credentials, see Security and access.
What are the Norce Backend MCP Servers?
The Backend MCP Servers are a set of domain-focused servers that sit as a thin layer between AI applications and Norce Commerce's existing APIs. They expose Norce's platform capabilities as structured tools that AI assistants — such as Claude — can discover and call.
Each server covers one domain:
| MCP Server | Coverage |
|---|---|
| Norce Config MCP | Applications, stores, sales areas, VAT codes, setup validation |
| Norce Product MCP | Products, categories, parametrics, flags, translations, bulk import |
| Norce Pricing MCP | Price lists, rounding rules, price reads, bulk import, Omnibus audit log |
| Norce Inventory MCP | Warehouses, on-hand quantities, customer-view availability |
| Norce Supplier MCP | Supplier configuration, supplier products, supplier price lists |
The servers are designed to work independently or together. When a task spans multiple domains — for example, importing supplier data with product content, retail prices, and supplier costs — the AI coordinates the relevant servers automatically.
Note: Additional MCP servers are planned, covering baskets, orders, promotions, and post-purchase management.
When to use the Backend MCP Servers
Use the Backend MCP Servers when you are:
- An operator or merchandiser who wants to check product readiness, fix missing translations, manage prices, or run availability checks through a conversation instead of navigating the Admin UI.
- A solution architect or partner setting up a new client environment, validating a configuration before go-live, or comparing stage and production.
- An integrator who needs to extract identifiers, run pre-flight checks, or set up and validate supplier integrations.
- A support engineer diagnosing a client configuration issue, often in combination with the Norce Assistant MCP Server.
If you are building a storefront or conversational shopping experience for end customers, see the Norce Commerce MCP Server instead — it is purpose-built for frontend use cases such as product search and basket management.
The MCP Servers are designed for interactive, conversational workflows — not for high-throughput or high-volume automation. If your solution needs to process large amounts of data continuously, or if you are building a clear-cut system integration such as an ERP sync or a data pipeline, you should build directly against the Norce Commerce APIs. The Norce Assistant MCP Server can help you with that development, but the Backend MCP Servers themselves are not a substitute for a proper API integration in high-load scenarios.
A few things the Backend MCP Servers are not designed for:
- Replacing direct API integrations — scheduled jobs, event-driven pipelines, and continuous data syncs belong in code, not in a conversation
- Real-time production monitoring — the servers are not a substitute for observability tooling or alerting systems
- End-customer facing experiences — for storefront product search and basket management, use the Norce Commerce MCP Server instead
For a full list of capabilities not yet available in the current version, and what is planned for future versions, see Limitations and roadmap.
Endpoints and protocol
The Backend MCP Servers are exposed per customer on the following URLs. Replace [customer-slug] with the same slug you use for other Norce Commerce APIs, and [environment] with the environment you are connecting to — for example playground.
https://[customer-slug].api-se.[environment].norce.tech/mcp/config/v1
https://[customer-slug].api-se.[environment].norce.tech/mcp/product/v1
https://[customer-slug].api-se.[environment].norce.tech/mcp/pricing/v1
https://[customer-slug].api-se.[environment].norce.tech/mcp/inventory/v1
https://[customer-slug].api-se.[environment].norce.tech/mcp/supplier/v1
Note on environments: The environment is part of the hostname — use the same base host you use for that environment's other Norce Commerce APIs and keep the
/mcp/[domain]/v1path. Credentials are environment-specific: a client ID created for one environment does not work against another.
- The endpoints use HTTPS and the Model Context Protocol (MCP) – Streamable HTTP transport.
- Requests are JSON-RPC 2.0 messages with standard MCP methods:
initialize,tools/list, andtools/call. - In most cases you should not construct these messages manually — use an MCP-aware client or the MCP Inspector for testing.
Authentication and headers
The Backend MCP Servers authenticate using client credentials passed as request headers. You will need:
| Header | Description |
|---|---|
ClientId | Your Norce API client ID |
ClientSecret | Your Norce API client secret |
AccountId | The Norce account ID for the customer environment |
You can create an OAuth2 client yourself in Norce Admin under Settings > Users > OAUTH. See Accessing APIs with OAuth2 accounts for step-by-step instructions on creating the client and obtaining the client ID and secret. For guidance on how to scope credentials by role and manage access for a team, see Security and access.
Activating MCP access
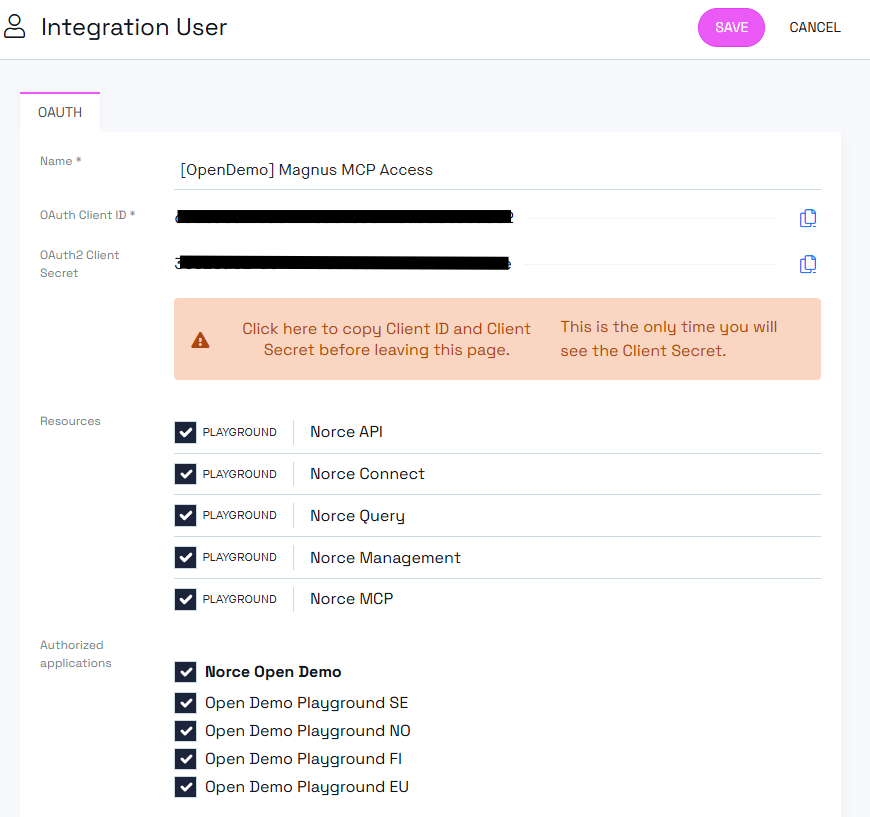
In addition to creating the OAuth2 client, you must explicitly activate MCP access for the client ID you want to use. This is done in Norce Admin — look for the MCP access toggle on the OAuth2 user settings page.
Required API access rights
The Backend MCP Servers do not have their own access layer — they call Norce's existing APIs on your behalf, using the same credentials you provide. This means your OAuth2 client must have the same API access rights it would need if you were calling those APIs directly.
Both of the following must be in place:
- Regular API access — the client must have access to the APIs the MCP server calls. Depending on which Backend MCP Servers you use, this includes the Management API, the Connect API, the Query API, and the Commerce Services APIs. Grant access to all of these to ensure full coverage across servers.
- MCP access — the client must have MCP access activated as described above.
If either is missing, calls through the MCP server will fail in the same way a direct API call with insufficient permissions would.
Configuration with mcp-remote
AI desktop clients such as Claude Desktop connect to MCP servers through a local configuration file. Because the Backend MCP Servers use Streamable HTTP transport and require custom headers, the recommended approach is to use mcp-remote as a bridge.
Note: The
mcp-remoteconfiguration described here is temporary. It will be replaced with a simpler, native connection method as MCP client support matures.
Example configuration
Install the bridge once with npm i -g mcp-remote (requires Node.js), then add one entry per MCP server you want to connect. The example below configures the Product MCP:
{
  "mcpServers": {
    "norce-product-[customer-slug]": {
      "command": "mcp-remote",
      "args": [
        "https://[customer-slug].api-se.[environment].norce.tech/mcp/product/v1",
        "--header",
        "ClientId: ${CLIENT_ID}",
        "--header",
        "ClientSecret: ${CLIENT_SECRET}",
        "--header",
        "AccountId: ${ACCOUNT_ID}"
      ],
      "env": {
        "CLIENT_ID": "your-client-id",
        "CLIENT_SECRET": "your-client-secret",
        "ACCOUNT_ID": "your-account-id"
      }
    }
  }
}
Repeat the pattern for each server you want to connect, using a distinct key per server (for example norce-config-[customer-slug], norce-pricing-[customer-slug], and so on).
Storing credentials in env keeps them out of the args array and prevents them from appearing in process listings.
Tip: Adding
"--transport", "http-only"to theargsmakesmcp-remoteconnect straight over Streamable HTTP instead of first attempting an SSE handshake, which removes a several-second delay at startup.
Prefer not to install the bridge? You can launch it through
npxinstead — set"command": "npx"and add"mcp-remote"as the firstargsentry. This downloads the bridge on every start, so startup is slower and less reliable. See the Claude Desktop guide for the details and a Windows caveat.
Available tools
Each server exposes a set of domain-specific tools. The exact list for your environment can always be retrieved by calling tools/list via any MCP client.
Detailed tool references for each server are available in the following guides:
- Norce Config MCP — tool reference
- Norce Product MCP — tool reference
- Norce Pricing MCP — tool reference
- Norce Inventory MCP — tool reference
- Norce Supplier MCP — tool reference
Suggested LLM instructions
When connecting multiple Backend MCP Servers to the same AI session, it helps to give the AI a brief description of how the servers relate to each other. This lets the AI coordinate across domains without needing to be told which server to use for each part of a task.
The following is a starting point you can add to your AI assistant's system prompt or custom instructions:
You have access to several Norce Backend MCP Servers. Each covers one domain:

- Config MCP: environment setup — applications, stores, sales areas, VAT codes,
  and environment comparison. This is primarily a lookup server. Use it to fetch
  shared reference data that other servers depend on: application IDs, sales area
  IDs, VAT code IDs, and store configuration. Application IDs retrieved from the
  Config MCP are recognised by every other Backend MCP Server — use the same IDs
  when calling the Product, Pricing, Inventory, and Supplier MCPs. When a task
  requires context such as which sales areas or VAT codes exist, start with the
  Config MCP.

- Product MCP: the product catalogue — products, categories, parametrics, flags,
  translations, variants, and bulk import. Use it to read, check, or update
  product data and metadata.

- Pricing MCP: price lists, rounding rules, price reads, and bulk import.
  Use it to inspect prices, diagnose pricing issues, and import price data.
  Sales area IDs and VAT codes needed here can be looked up in the Config MCP.
  Be aware of short propagation delays after a freshly imported price — the
  storefront preview tools may briefly return the old value. To verify an
  import, use the raw price read (get_sku_prices), which is uncached.

- Inventory MCP: warehouses and stock quantities. Exposes customer-view
  availability — the stock level as a customer would see it with availability
  rules applied — not just raw warehouse numbers.

- Supplier MCP: supplier records, supplier warehouses, supplier price lists,
  and supplier product mappings. Use it to set up, validate, or inspect supplier
  integrations.

When a task spans multiple domains, coordinate the relevant servers. For imports
that involve product content, retail prices, and supplier costs, submit the
product content import first, then run the price and supplier cost imports in
parallel, and poll all three jobs for completion before reporting the result.

Write operations on stage and production environments are gated. Lower-risk
changes generate a visible warning; higher-risk operations are refused until
explicitly confirmed, and a few destructive ones require confirmation on every
environment. Read operations are always safe.
Adjust the instructions to match the servers you have connected and the environment your team works in.
Multi-environment setup
If you connect Backend MCP Servers for more than one environment — for example, both a stage and a production setup — use a clear naming convention in your MCP configuration so the AI can distinguish between them. A good pattern is to include both the customer slug and the environment in the server name:
norce-product-acme-stage
norce-product-acme-prod
norce-pricing-acme-stage
norce-pricing-acme-prod
When you configure multiple environments, add an instruction to your system prompt that explains the naming and when to use each. For example:
You have access to both stage and production Backend MCP Servers for Acme.
Server names ending in "-stage" connect to the stage environment.
Server names ending in "-prod" connect to production.

Always use stage for testing and verification. Never write to production
without explicit confirmation from the user. When comparing environments,
query both and present the differences clearly.
Application IDs in instructions
Most tools require an application ID as input. The agent can find one by calling norce_config_list_applications without an ID, which lists the applications your credentials authorize. Including the application ID in your LLM instructions saves that step, so the agent can start working without looking it up or asking.
For a single environment, add a line like this to your system prompt:
The application ID for the Acme storefront is 1001.If you have connected multiple environments with different application IDs, specify both:
The application ID for the Acme stage storefront is 1001.
The application ID for the Acme production storefront is 1042.
Application IDs are shared across all Backend MCP Servers — an ID that works in the Config MCP will work identically in the Product, Pricing, Inventory, and Supplier MCPs.
Testing with MCP Inspector
The MCP Inspector is an interactive developer tool for testing MCP servers without writing any client code.
npx @modelcontextprotocol/inspectorIn the Inspector, select Streamable HTTP transport, enter the MCP server URL, and configure the required headers (ClientId, ClientSecret, AccountId). The Tools tab lists all available tools with their input schemas and lets you execute them directly.
For more information, see modelcontextprotocol.io/docs/tools/inspector.
Troubleshooting
For a full list of common problems and their solutions — covering authentication errors, empty tools lists, import issues, price propagation, and multi-environment configuration — see Troubleshooting and FAQ.