Accessing APIs with OAuth2 accounts
The Norce Commerce uses OAuth2 access tokens to authenticate requests. You can view and manage your API integration users in Norce Admin. The integration user carries many privileges and should be treated with care.
Rate limitations
The JWT Token returned by a successful authentication is valid for 3600 seconds (1 hour). Ensure that the token is cached during that period. Exceedingly requesting new tokens will negatively impact performance. To ensure that tokens are properly cached, there’s a rate limit on the authentication request:
- Max 3 requests per minute per IP address, with a possibility to burst 20 more (to ensure that starting up multiple services in parallel works).
- Successful requests will return a HTTP Status Code 200
- Rate limited requests will return a HTTP Status Code 429
Create API Tokens
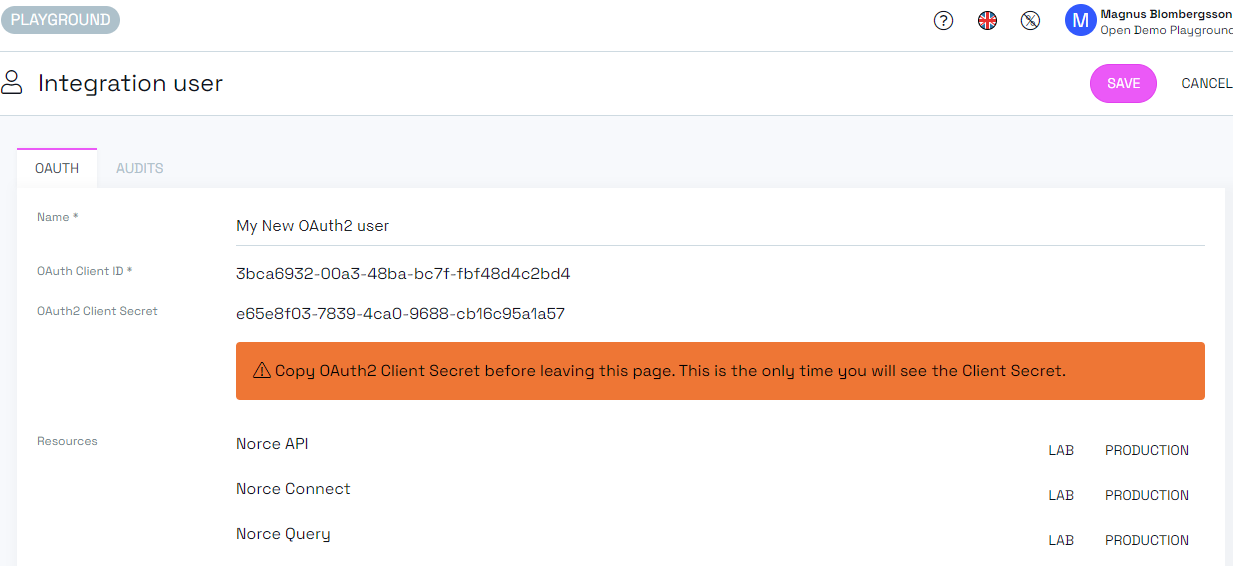
API integration users are created in Norce Admin by going to Settings > Users > OAUTH. You need to provide a name for your user, specify which applications it should have access to, and the environments it should be valid in.
Once you save your OAuth2 user, you won’t be able to see the secret key anymore, so make sure to copy it before closing the tab.

Testing API Tokens in Postman
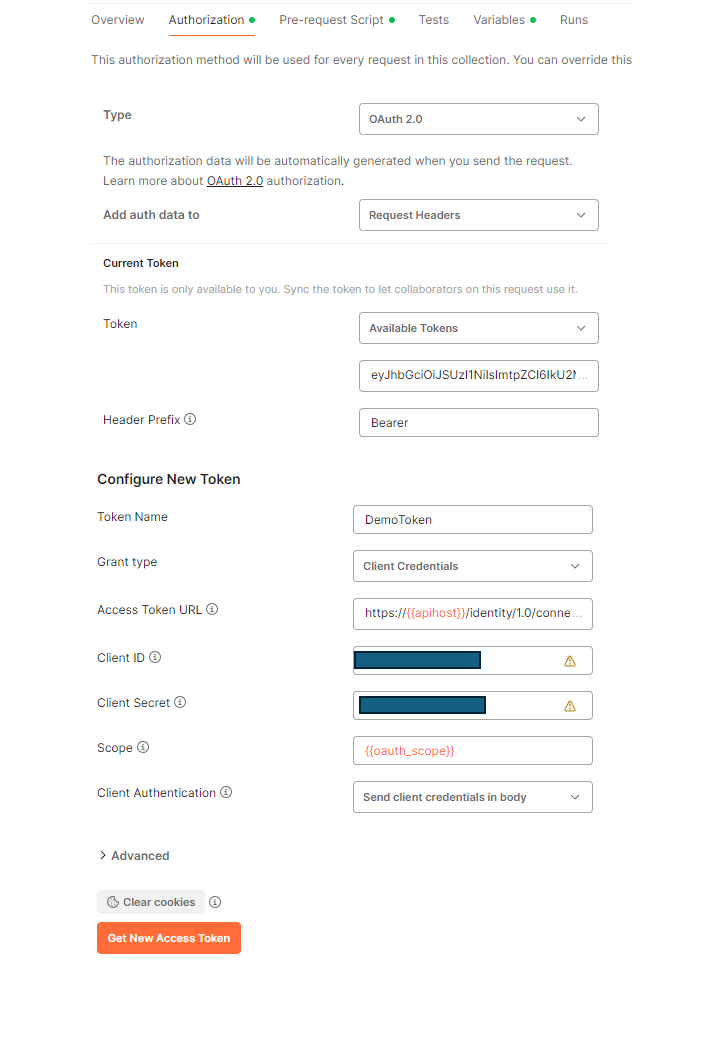
Once you have created your integration user, you can try it out in Postman. In a single request, you can go to the Authorization and configure a new token with the following values:
| Item | Value |
|---|---|
| Token Name | Name of token |
| Grant Type | Client Credentials |
| Access Token URL | [clientname].api-[region].[environment].norce.tech/identity/1.0/connect/token (*)(*2) |
| Client ID | Client ID created in Norce Admin |
| Client Secret | Client Secret created in Norce Admin |
| Scope | Space delimited playground, stage or prod |
| Client Authentication | Send client credentials in the body |
For Norce [Storm], see Storm documentation

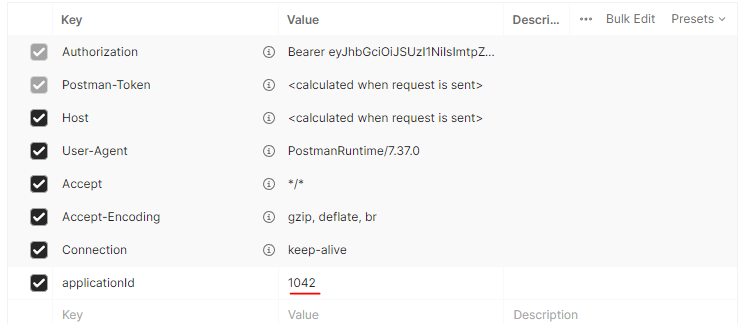
Also, make sure to send the application ID in your request header.

Using OAuth2 with Norce Commerce
Norce uses OAuth2 with a client credentials flow. To use our APIs, first request an access token, then use that token as a Bearer token in the Authorization HTTP header.
Request Tokens
To access your API, you must request an access token for it. To do so, you will need to POST to the token URL: [clientname].api-[region].[environment].norce.tech/identity/1.0/connect/token (no environment for production) or for Norce [Storm]: https://identity.storm.io/1.0/connect/token
Parameters:
| Parameter | Description |
|---|---|
grant_type | Always client_credentials |
client_id | The "Oauth2 Client ID" obtained from Admin UI |
client_secret | The "Oauth2 Client Secret" obtained when creating the integration used in Admin UI |
scope | playground, stage or prod |
Code examples
Request a token:
=== "cURL"
curl --request POST \
  --url 'https://norce-open-demo.api-se.playground.norce.tech/identity/1.0/connect/token' \
  --header 'content-type: application/x-www-form-urlencoded' \
  --data grant_type=client_credentials \
  --data client_id=<OAuth2 User ID> \
  --data client_secret=<OAuth2 User Secret> \
  --data scope=[lab|production]

# Response
{
  "access_token": "eyJhbGciOiJSUzI1NiIsImtpZCI6IkU2MASDDDSTMzN0U2Qzk3RkUxQTAyOTc2MjgxRTg5RjFFRDcyODIiLCJ0eXAiOiJhdCtqd3QiLCJ4NXQiOiI1aE0zNXNsX2VJY2k0YUFwZGlnZWlmSHRjb0kifQ.eyJuYY8jnkdHJSKY3NDQsImV4cCI6MTYxODkzNzM0NCwiaXNzIjoiaHR0cHM6Ly9pZGVudGl0eS5sYWIuc3Rvcm0uaW8vMS4wLyIsImF1ZCI6IlN0YWdpbmciLCJjbGllbnRfaWQiOiJiZWY0MmU1NC1kNjlmLTQzN2ItYmFhNS0yYTVhMTEzMjNkMzMiLCJzY29wZSI6WyJTdGFnaW5nIl19.jO9EyFA-jok8DHJHSvAj_C1m6ScKVrPht6AKsOixsQeBrJK-1hZ1fOYfwIGGu4Gy7DXRjVfqkrgaOPg1KCLgLYdSKj0Lgdu2745ax795P50u1cUTvcXOOHTqqB_H9r7ALcRjxcNPFURCyFBARuPgPGmecRrsTed95A0rS_1S-QGGiG46tus7BJ6290jYmapMOWiZffHwnMA5ziD0hjwriPxmnHXPBzKDZU2wUfAMnwP_2j_NLcrF3Enezkd9B7WX6F10y-Bk9pjBSR_U188bwyp6Yvd02spZtKV_uYBnqzemP-00ZdjMjd0QOdxPm0PtosnGlHmVDFiAMPgHmXmnfqOfQrwTatphoMqjxBumqsNLrvpJEo6VrkbwtEqW_RxMhjcFgOpVNAuZekCYUbp7eYyGJRbQdTHSpAZgGoghKnPygCsJRMx3ZB1iAhf-pQHK-IIJ_d8h3Bf_2pZU-_D-rM2nV_OqO8IQw9gNsXJay23XbtCF0MdmZKVyIniQpMFBa7_84uV2tgmn31YlYYZeig0YyG-VxfYZSNkbHuHguP4LeZURXOn58r_BUkguI_CL2j-X7T3n0k8BFUQv2ZY2brr24QnCR8wZqe2m6wIajYgsFd_TPBelAlrn9XcBhDGeGA7zXEvAOEciDgEzVSfkjds8DDSf0dOVkVM_nlo",
  "expires_in": 600,
  "token_type": "Bearer",
  "scope":"lab"
}
=== "Javascript"
// Note that this is vanilla Javascript to illustrate how to obtain and use an Access Token. You will need
//to add caching of your token since obtaining an access token for each request will generate poor performance.

const response = await fetch(url, {
  method: "POST",
  headers: {
      "Content-Type": "application/x-www-form-urlencoded"
  },
  body: {
      client_id: "<OAuth2 User ID>",
      client_secret: "<OAuth2 User Secret>",
      grant_type: "client_credentials",
      scope: "[playground|stage|production]"
  }
});
let oauthResponse = response.json();
=== "CSharp"
/* Note that these are vanilla C# illustrations, more like pseudo-code, on how to obtain and use an Access Token.
You might want to use IdentityModel and/or other frameworks in your implementation. */

var cache = new CachingService();
var httpClient = new HttpClient();
var oauthClientId = "<OAuth User Id>";
var oauthClientSecret = "<OAuth User Secret>";
var environment = "<lab | production>";

string accessToken = cache.GetOrAdd("AuthorizationToken", () =>
{
    var requestBody =
        $"client_id={oauthClientId}" +
        "&client_secret={oauthClientSecret}" +
        "&grant_type=client_credentials" +
        "&scope={environment}";
    var tokenRequest = new HttpRequestMessage
    {
        RequestUri = new Uri("https://norce-open-demo.api-se.playground.norce.tech/identity/1.0/connect/token"),
        Content = new StringContent(requestBody,
            Encoding.UTF8,
            "application/x-www-form-urlencoded"),
        Method = HttpMethod.Post
    };
    var httpResponse = httpClient.Send(tokenRequest);

    if (!httpResponse.IsSuccessStatusCode)
    {
        // Handle error
        return null;
    }
    var response = JsonSerializer.Deserialize<Dictionary<string, object>>(httpResponse.Content.ReadAsStringAsync().GetAwaiter().GetResult());
    return response["access_token"].ToString();
}, DateTimeOffset.Now.AddSeconds(500));
===
Note that you will need to add caching of your token since obtaining an access token for each request will generate poor performance.
The returned token should be provided as a Bearer Token in an Authorization HTTP Header.
As the example response shows, the token expires in 600 seconds and needs to be renewed after the expiration.
Norce might change this value in the future.
Using the token:
curl --url https://norce-open-demo.api-se.playground.norce.tech/commerce/metadata/1.1/GetApplication?format=json \
  --header "Authorization: Bearer <Token from response above>" \
  --header "ApplicationId: <Numeric Application ID>"
const response = await fetch(url, {
    method: "GET",
    headers: {
        ApplicationId: "<Numeric ApplicationId>",
        Authorization: "Bearer " + oauthResponse.access_token
    }
});
var request = new HttpRequestMessage
{
    RequestUri = new Uri("<API Endpoint>"),
    Method = HttpMethod.Get,
    Headers =
    {
        {"Authorization", "Bearer "+accessToken},
        {"ApplicationId", "<Numeric ApplicationId>"}
    }
};
var methodResponse = httpClient.Send(request);